A while back I saw a gadget called a TrimmBlock that was used to tune the sails of an RC sailboat. Sadly, when I tried to buy one of these, they were no longer available for purchase. To me there was only one option, make one for myself using my 3D printer.
RC sailboats have lots of adjusters on them to tune the sails for maximum performance in the prevailing wind conditions. There are adjusters that set the camber at the foot of the sails, others that set the sheeted in boom angles, yet others that adjust the twist of the sails. Each of these adjustments has its own value, usually a few millimeters to a few tens of millimeters. The TrimmBlock allowed a skipper to measure and set these values easily and quickly.
When I set out to reproduce the TrimmBlock I quickly adopted a number of improvements and changes to the design. I also included a pivoting plate attached to the measuring part that had the base measurements for multiple sailboats etched into it.
The measurement plate has large notches along one edge and small notches along the other edge. The notches correspond to the millimeter measurement numbers on top. The triangles at one end indicate where the measurements relate to.
The large notches fit the jib booms whereas the small notches fit the backstay and topping lift lines. To set the camber of a sail, large notch corresponding to the required setting is placed on the boom at the 40% chord position and the reference end placed to touch the foot of the sail. The sail camber adjuster is then used to make the sail fit neatly to the reference end of the tuning stick.
The second plate is pivoted with the measuring plate and holds the settings for the cambers, boom angle, and twist of each sail. In the graphic the measurements are listed for both DF65 and DF95 sailboats. The pivoting rivet comes in two parts that are glued together to complete the assembly.
3D printing is a very capable method of producing custom parts for model RC boats. I use Autodesk Fusion 360 to design my parts and 3D print them using my Creality Ender Pro. I typically use Tough PLA filament for my parts. It’s easy to print and is generally tough enough for the type of sailing I do. If you want to use a more exotic filament material that your printer doesn’t handle very well, you can get your parts printed in a choice of materials by any number of vendors on the Internet.
Here are some pictures of the type of parts I have made for my boats.
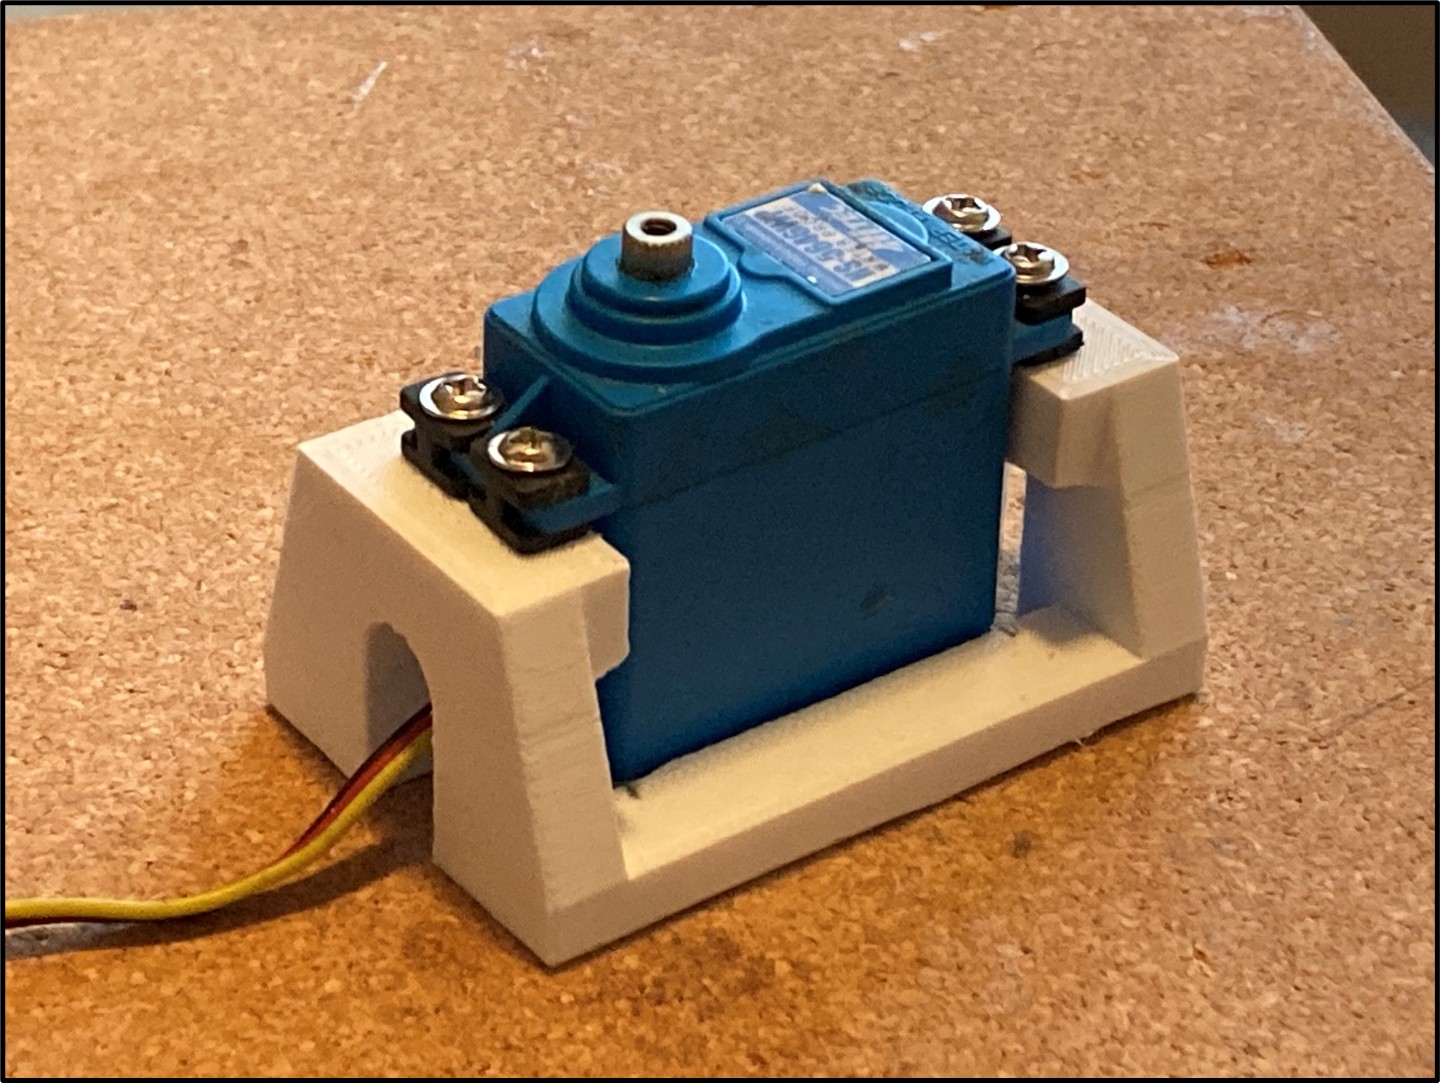
Victoria Parts
This graphic shows a Victoria servo mount with various sail servo and rudder servo combinations, a deck brace, rudder arms, and boom fittings, all of which have been 3D printed.
Victoria Gooseneck — (9mm carbon mast)
This graphic shows a gooseneck for a 9mm carbon mast for a Victoria. The gooseneck is drilled for a 4mm diameter swivel bolt, and for channels for hold down line for the main boom.
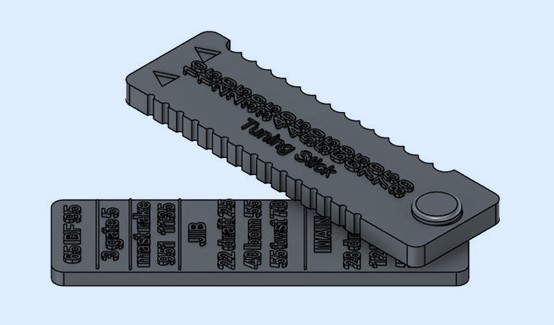
DF65 DF 95 Tuning Stick
This graphic shows a 3D printed tuning stick for DF65s and DF95 sailboats. The stick is made of two parts, one with the measurement notches, the other with the standard values for DF65 A+ rigs and DF95 A rigs. The two parts are fastened together with a plastic rivet that allows them to swivel. Other values can be written on the backs of the parts using a Sharpie.
I got myself a 3D printer for a Christmas gilt. Well actually, my wife bought it as a gilt but I specified the type and where to buy it from. Before you get all hissy, she specifies her jewelry gifts for me to buy for her so it is a two-way street. The printer I got is an Ender 3 Pro for the 3D printing cognoscenti. For everybody else, it’s possibly the most popular 3D printer at the moment because of its price and capability. I’m pleased with it and I have been busy making things to try it out.
Dual Extruder 3D Printer
“So what is a 3D printer and why did I want one?” I hear some of you say, well it’s a device that produces 3D objects from a computer modeling program. For most hobby-grade 3D printers it does this by melting plastic string to make the object. The plastic string comes as a reel that is mounted to the printing machine. The string, or filament as it’s properly called, is fed into heated nozzle where it is transformed into a molten thread. This thread is then placed onto the surface of a platform or platen that is moved from front to back by the computer. The nozzle is mounted so that it can be moved from side to side and up or down, also under computer control. By drawing a two-dimensional slice of the object being built onto the platen, then lifting the nozzle up a little bit before drawing the next slice on top of the first, the 3D object can be made, slice by slice.
These printers are used by hobbyists for fun projects. I wanted one to make parts for my model planes and model boats. Simple parts that cost a lot to buy and are hard to find. 3D printers are also used professionally to produce prototypes of new products for consumer testing or complex parts for high technology industries. More complex 3D printers are used to produce prosthetic limbs and other complex structures.
3D-printed Brake Caliper
3D-printed Prosthetic Limb
Specialized printers produce sintered metal objects such as jet engine compressor blades. SpaceX makes parts for their rocket motors using a metal deposition 3D printer. Other printers use a bath of metal powder and a laser to produce the 3D print. Yet others use a bath of liquid monomer chemical and a laser that draws on the surface generating a polymer trace to make the 3D object. The applications continue to grow as more and better 3D printers are developed.
The mention of laser 3D printers reminds me of a time long ago and far, far away when I was working as a postdoc researcher in the chemistry department of a large university in England. We were studying the chemical applications of laser technology. We did in fact produce the first laser induced chemical reaction
3D-printer Compressor Blades
and the first laser induced reversible isomerization. In our department at that time we had a guest member of staff who was given facilities for his research but was not paid a salary. He earned his living by scientific writing, particularly in writing a weekly column for the UK’s most prestigious popular scientific magazine.
Laser-powered 3D Printer
We would often meet over coffee where he would present us with his latest crazy idea for a column. These columns were very amusing and intellectually challenging since they would always have within them a technical flaw that made their claims specious. On one occasion he asked about the possibility of filling an aquarium tank with a monomer that required two different laser colors simultaneously to produce polymer. If we could organize things such that the two different lasers were made to cross inside the tank, they would produce a blob of hardened plastic polymer. By scanning the lasers about we could make a three dimensional object; an early generation 3D printer before they had been invented; we thought. This ‘invention’ was only for the amusement of his readers but when he published the idea little did he anticipate the reaction. He and his publisher were served with a writ to cease and desist by a company claiming contravention of their patent. This writ came from some company in the USA who didn’t seem to have much of a sense of humor and were unable to detect the spoof that it was.
SpaceX Draco Rocket Motor with 3D Printed Parts
My current interest in 3D printing is focused on my RC sailboat hobby; I want to make a 3D printed model sailboat. I know that others have done this but I’m not interested in copying them so much as learning from their experience to build my own model. Since my printer doesn’t have a print volume large enough to accommodate a complete model, I will have to build it in sections then glue them together, much like most large ships are made today.
To do the design work I use Autodesk Fusion 360 as my CAD program. This is available for free for non-commercial hobbyist use. When I have an object that I want to print I save it as a STL file then I use Ultimaker Cura to slice it. The Cura slicing program does basically what it says; it makes the 2D slices from the 3D model that are then stacked on the printer to produce the 3D object. Once I have the GCODE file made by the slicer, I load it into the printer, load up the printer with the chosen filament, warm it up and set it going. Prints can take a long time. An object about 1cm by 1cm by 1cm will take a bit less than an hour to print but larger objects can take all day.
Luckily I have two sailing buddies who have printers and they have given me lots of tips on how to get the best results. They also made some parts that I wanted before I got my own printer. The most notable of these parts was the mold for a ballast bulb that one of my friends made for me for my US 1M build.
Ballast Bulb Design for my RC Sailboat
He took the airfoil shape that we wanted and modeled it using Fusion 360. The CAD software gave an estimate of the volume of the torpedo shape and we combined that with our best estimate of the density of the material we would use until we got close to the 4lbs weight I was looking for. He then printed out the half mold in two sections on his printer. I glued the two parts together to get a mold of the lower (or upper) half of the bulb shape. This I filled with epoxy resin and #7 lead shot. When it set, I removed the shape, made a second piece and epoxied the two together. A little filling and filing, a couple of coats of primer, a coat of black paint and some clear lacquer, and I had a perfect bulb weight for the keel of the boat.
As I said earlier, I’m having fun with my printer. If you want to know more just Google 3D printing and you will get a huge list of information about them including places that will make a 3D print for you as a service, albeit not a cheap one.